Madsu Masthead

A lot of rain kept me from getting top coat on Madsu’s spars today. So I turned my attention to the masthead, where I’m adding an anchor light and a windvane.

Since I was installing a post for the light, which means tapping 2 holes in the mast head, I figured there must be a way to use the same machine screws to attach a bracket of some sort on which I’ll mount the shaft of the windvane. I had ordered a ‘special’ bracket from Catalina Direct that uses the upper shroud tang, but like a few things I’ve ordered, it doesn’t actually fit the hardware on my mast. When a boat’s 30 years old, who knows what kind of mods have been one to the rig, so it’s not a huge surprise, but a little disappointing since I can’t return it ;-(

After cutting a short length of aluminum plate, I bent it into a bracket using a vice and a ballpeen hammer – low tech but it worked out ok. It’s too long but I’ll cut and soften up the edges now that I know it’s all going to fit together.

I’ll drop in 4 new sheaves for the main and jib halyards as soon as I shave down the spacing plate (the new sheaves from Catalina Direct are a bit too wide – easy fix if I trim the spacer a bit), I’m switching to all-line from line/wire. And of course, the new spin crane looks very inviting !

Mast Conduit and Primed

One last thing to do before I can paint Madsu’s mast, and that’s installing conduit for wiring inside the mast.

Madsu had no steaming or anchor light, and last season I got by with a portable LED that I’d hoist when needed. It worked ok but wasn’t great. When I redid the electrical system last month I installed enough circuits to incude a steaming light and masthead anchor light.

I debated whether it was worth the trouble of running conduit up the mast – but figure if I don’t I’ll be regretting it the first night an anchor as the wires clang away inside the mast.

I opted for 3/4 inch PVC conduit that will have more than enough room for the 3 wires I need to run – plus room for VHF coaxial should I decide to add a masthead antennae later. I got a laugh when I saw the label on the conduit – C22 for a C22. Nice.

Of course the conduit has to be secured, or it will bang around. This is easier said than done.

The conduit is riveted in place using a technique I read about online somewhere. Starting at the base of the mast I was able to hold the conduit in place while I drilled a hole in the mast and the conduit and popped in a rivet.

From there it’s a matter of drilling a hole 6 inches or so along, using a small Allen key to hook the conduit through the hole (in order to hold it in place), then drill another hole a further six inches along and pop a rivet in. After I was done, I filled all the extra holes and was ready to etch, condition and prime.

The mast got it’s first layer of base coat this afternoon – the boom got its 3rd and final coat of base. I should be able to get a couple more coats of base on the mast tomorrow, then on to the topcoat in a couple of days, assuming the weather holds.

Madsu’s mast

With the boom primed and ready for topcoat, I’v opted to prep the mast so I can paint both spars together.

With the experience of working on the boom under my belt, things are going much quicker on the mast. Madsu’s stick is 25 feet 2 inches long.


After filling some old screw holes I sanded the entire mast down to bare metal. Tomorrow I’ll etch, condition and prime.

As with the boom, the hardest work was in getting the hardware off the mast. I was pretty luck and got most of the fittings off with little trouble. I did have to drill out 3 of the 9 screws used to fasten a 1 inch T-track on the forward end of the mast. You can see the corrosion on the machine screws in the photo below, as well as the remains of the screws I drilled out.

Madsu’s standing rigging is now taking a break – I guess it’s ‘sitting rigging’ for now.

I’m replacing the rope to wire halyards with all rope low stretch line. I’ve got a bit of work to do on the mast head fitting – there’s a new anchor light and windvane to attach, as well as swapping out the sheaves for the new halyards.

Naked Boom Gets Primed

I sanded Madsu’s boom down to bare metal yesterday as I get ready to paint it.

After removing all the hardware I sited all the new/changed hardware and drilled and tapped the holes. I’ll use stainless machine screws instead of the self-tapping screws the previous owner loved. I’ve filled all the old holes with Star Brite aluminum epoxy.

The spar’s in great shape. I used a rotary sander to get the mast stripped down then use my Makita sander with 220 paper to prep it.

I used PPG DX 533 to etch the boom, then quickly followed up with PPG DX 503 conditioner. I got both at my local Lordco auto parts store – way cheaper than trying to find the marine version of same.

Once the DX 503 was rinsed and the boom dried, I immediately got the first coat of primer on. You can’t let the aluminum sit for any length of time after treatment because of oxidization (so I’m told).

I’ve opted for the tried-but-true-but-messy-and-smelly 2 part primer.

The Interlux 2 part is a lot more trouble – it’s really 3 part because even after you mix the 404 base with the 413 reactor, you still have to thin it 20 to 25%.

I wasn’t really sure how to work with the base – it’s the consistency of pudding – and you can’t pour it. I just stuck a mixing stick into the can and pulled it out, about an ounce or so stuck to the stick and I was able to use this ‘honey stick’ method to measure out what I needed.

I first tired a small foam roller – that was useless. Next I tried a disposable foam brush – that worked better. But a regular paint brush works best of all – the paint is thick and spreads beautifully, and there’s no worry about brush strokes showing up.

(boom after 1st coat of primer)

I left it overnight and sanded with 220 paper and got a 2nd coat on this morning. The weather’s been cold and I’d prefer it was a bit warmer to make sure the primer is really baked – I’ll give it a couple of days then do a 3rd base coat.

Now that I’m confident with is all going to work (!), I’ll strip the mast and get it primed, then I’ll topcoat both the boom and the main at the same time. I’m using Interlux Perfection, another 2 part, for the topcoat.

A quick survey of my mast hardware turned up a few issues. I was hoping to replace the spreader brackets, so last fall I ordered a stainless set from Catalina Direct.

Turns out my spreaders are 1 1/8th inch in diameter but the new brackets are 1 inch. Ugh. I’m thinking I’ll either leave the old brackets (which Catalina Direct claims are prone to unexpected breakage) or visit my new best friends at the metal store and pick up some 1 inch aluminum tubing and make my own ‘new’ spreaders.

Outhaul Exit Tweak

I’ve finally finished tweaking Madsu’s boom for the new internal outhaul system I mentioned a few days ago.

In order to make sure the outhaul doesn’t bind when pulling on the main, I figure I have to get the exit block at the end of the boom up as high as possible – which actually means mounting it in the sail track.

So the challenge here was how to mount the Harken thru-deck turning block in what is essentially the sail track. I also want the block to be rock-solid.

Working on the farm with my dad and uncles, they’d often have to tweak some piece of machinery – and in French they’d call that tweak a “patent”. Cleary, that’s what’s called for here.

All I really want to do is bolt the block in place, but there isn’t room for me to get a lock nut on the forward end of the block. I probably could rivet it in place, but I’m not convinced that’s going to work.

So, I figured I’d make an aluminum plate that will slide inside track, under the block. I’ll drill and tap for fasteners and it should all work ! The photo below shows how I want the block to sit, tight up against the slot in the boom.

I’m not really equipped to be machining parts, but I figured with my jig saw and a bench grinder, I should be able to make something that would work.

It isn’t pretty, but it’ll be out of sight anyway. Not the simplest thing to cut with a jig saw, I’ll say that much…

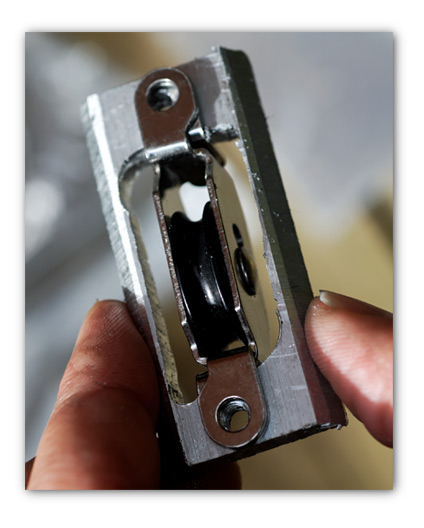
Here’s my “patent” when I slide it into the sail track.

The idea is that the thru-deck block is now sandwiched between my “patent” and the top of the sail track.

All I need to do now is drop in a stainless steel machine screw, tighten it up, and my exit thru-deck block is rock solid (I’ve left off the block cover so you can see the detail a bit better).

This was the last bit of detail I needed to finish on the boom before painting.

I’ve now drilled and tapped holes for all the boom hardware, including cheek-blocks for reefing lines, the outhaul exit block and cleat, and a few more bits of hardware for line management.

I’ve opted to simplify the reefing system quite a bit, just going to use a hook at the tack. For the clew, I’ll just use a single line attached to boom, up through the through the ‘new’ clew, down to a cheek-block on the other side of the boom, and forward to a cleat near the front of the boom.

Last season I was using a single line reefing system, with the line brought back to the cockpit. This was the set-up from the previous owner, and it was a nuisance.

For one, I was always going to the mast to lower the main halyard anyway, so having the reefing line in the cockpit was unhelpful. When not in use, the long line was always getting in the way no matter how often I stowed it, and when we dropped the main, it was even more in the way.

My new North Sails main has 2 reef points, so I’ve got 2 identical lines set up at the clew end. From their cheeck blocks they go forward along the boom, lead through beckets to the cleat.

The boom is stripped of all the hardware now, all the holes are drilled and tapped, so if the weather improved a bit I’ll try etching and painting the boom in the next few days