Tag Archives: Catalina 22

Albertan Makes My Day and other Stories from the Coast

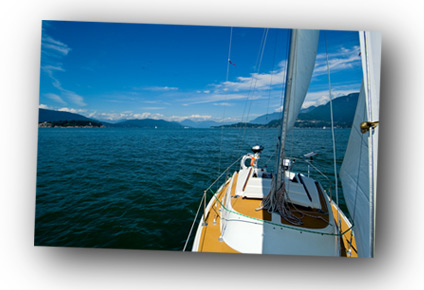
Garnet and I had an incredible day on the water Saturday. We sailed Madsu from Horseshoe Bay at Granville Island and back, all for the sake of a little lunch in the market.

We logged about 27 miles on the trip there and back, all but 5 of them under sail. It was one of those perfect ‘set it and forget’ days with a steady wind around 10 knots.

The day started on an auspicious note, even before we hit the water. On the drive from home to Horseshoe Bay we stopped for gas. While gassing up a tourist came over to ask for directions and I stood and talked with him for a bit. In doing so, I put my wallet on top of the car, and promptly drove off.

Fortunately, the very same tourist followed me out of the gas station and spotted my wallet. Some frantic horn honking got my attention and the day was saved. So, the the tall blonde couple from Alberta at the gas station in North Vancouver who asked for directions to Stanley Park – thank you for making my day.

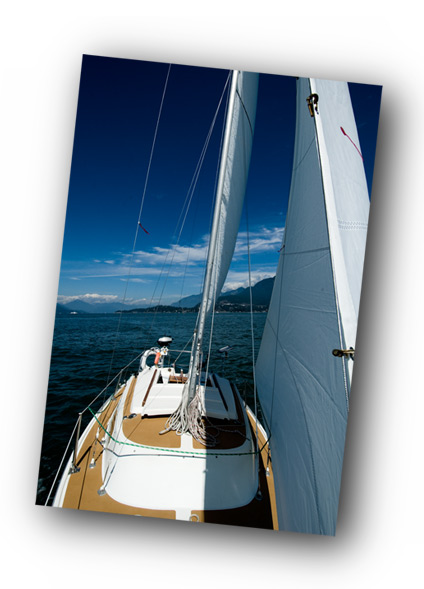
Our trip from Horseshoe Bay out was lovely – the sun was hot and the boat was humming along at a nice pace. With my back to the pushput and the tiller extender in hand, I managed to sit back and relax in the sun for most of the trip out of Howe Sound, interrupted by only a couple of tacks as we worked out way to weather on a steady inflow.

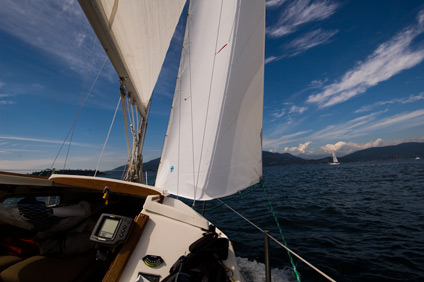
The trip down into English Bay was a straight shot and of course as we got closer to Vancouver the sailboat traffic increased rapidly, with the usual collection of outbound yachts, day sailors, and a gaggle of Lasers and Hobie’s flying out of Jericho.

As usual the docks around Granville Island were packed so we milled around a bit and got lucky as 40 foot sloop signaled he was pulling out. We tucked in, tied up and headed for the market to devour a late lunch. As usual, the market was packed but we managed to find a couple of stools and chowed down. Next stop, the Kids Market for a quick purchase of much needed new Lego for G and a strong coffee for me.

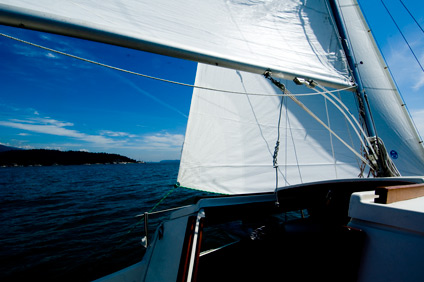
The trip back was lovely – we cruised by the beach at English Bay which was of course packed. Garnet pointed out a few naked sunbathers who were obviously shielded from the beach side by some big rocks but sitting ‘en plein air’ from the water. Not that there’s anything wrong with that.

We fired up the iPod and listened (and laughed) to Ricky Gervais and gang – it’s become a ritual on the boat to listen to his podcasts (over and over).

We were dockside at our slip at Sewell’s by 9pm. A fantastic day – pure west coast magic – saved from disaster by a lovely couple from Alberta.

Hot Moon Cruise

Some of my fondest memories of sailing the west coast were as crew on board a Spencer 51 owned by brothers Ian and Colin Morse.

We did a lot of night sailing and those cruises under the full moon in the Straight of Georgia will be etched in my mind for a long time. They were magic, and I learned a lot on those trips. Inviting me along was a gift I’ll never forget, and for which I’ll always be thankful to ‘the boys’.

There’s nothing quite like sailing under a full moon, especially when the wake is streamed with bioluminescence. About the only thing that comes close, for me, is seeing the Northern Lights.

With the full moon on Wednesday this week, I’m hoping the clouds clear so we can take Madsu out for a night cruise.

According to the Farmers’ Almanac, this month’s FM is known as Full Strawberry Moon, Rose Moon, or Hot Moon.

Full moons fall mid month throughout the summer and fall and we’re planning night sails for as many as we can get.

Fathers’ Day Perfect

I’m a dad and I don’t really make a big deal, or expect a big deal on Father’s Day.

My two sons and I spent the day sailing on a picture perfect BC day, and I must say it was the best Fathers’ Day ever.

Another great day on the water with a steady 10 – 12 knots inflow wind in Howe Sound. We hoisted the main and didn’t even bother with the jib.

We made great time on a close reach over to Bowen Island. Passing a gaggle of kayakers we did a quick tour around Manion Bay, gybed, and scooted back across on a reciprocal course.

There were loads of sail boats heading over from the mainland to Snug Cove perhaps for a late Fathers’ Day lunch. Hope their day was as fun as mine.

thanks boys.

Friday the 13th Sail

Managed to get through another Friday the 13th without incident.  To celebrate, we ordered some pizza and headed down to the boat for an evening sail.

It was a beautiful evening, and we zipped over to Bowen Island and back in no time at all.  EB was on the helm and managed to top 6 knots smg at one point.

We managed to see all three ferries – Bowen, Langdale and Nanaimo – and even though I’ve been sailing out here for years I still like the sight of a ferry steaming by like we’re standing still.  It sparks memories of every single ferry ride across the Straight when I was on the inside,  looking longingly out at boats under sail, wishing I was there, too.

We met more of our moorage neighbours when we returned to Sewell’s, including the folks right next to us who were heading out for the weekend.

Howe Sound Perfection

I’m really liking having Madsu moored at Sewell’s in Horseshoe Bay. The downside is that the slip is tight and there’s ferry wash, but its not really a big deal. An extra spring line seems to be handling the turbulent wash all right, and a tight slip is just good practice.

The great thing is that the docks are buzzing with activity. Sewell’s is famous for its power boat rentals, but they also run Sea Safari Zodiak eco tours and I love seeing the participants waddling down the dock in their red cruiser suits ready for a zoom around the Sound. The dock staff are young and friendly (and cute) and there’s a constant stream of tourists checking out the boats.

I had 2 different couples, also with boats on the finger I’m on, come over and introduce themselves in the short time I spent getting Madsu set for a sail. There’s a scuba boat just up the dock that picks up and drops off on a regular basis. Sewell’s also have a boat launch which is surprisingly busy, both with launches and recoveries, but also is used for small barges hauling all sorts of things.

As much as I love the hubbub dockside, the trip out under power is super short – just a few minutes and I’m under sail is marvelous Howe Sound.

I had a spirited sail over to Bowen – Madsu’s never been so speedy thanks to new sails from North Sails. I popped a reef in part way across and still managed to hit 7 knots in the puffs. It was a classic inflow and with very little chop, it was an awesome sail over. After the outbound Bowen Ferry left Snug Cove, I tacked over and played in the puffs for a few hours.


And those new Andersen self-tailers I installed ? Worth Every Penny.

A River Runs Through It

There’s something magic about living in Vancouver, and it’s easy to forget what an amazing place this is.

This morning I got up and took transit from North Vancouver to Richmond. One transfer and an hour later, I was sitting on the deck of Madsu at Skyline Marina on the Fraser River in Richmond.

I spent the next few hours motoring down the North Arm of the Fraser – enjoying a completely different aspect of Vancouver – one you forget is there when sitting in city traffic.

By the time I was off the river and into English Bay the sun decided to show up – and my trip over to Howe Sound and Horseshoe Bay was a delight.

So many different aspects to the city in one short day. From sitting on a bus in rush hour traffic to watching a bald eagle feast on a salmon. Gotta love BC.

Madsu Upgrades Slide Show

After taking a lot of bits and pieces apart, I’m finally reassembling Madsu and we’re just days away from getting her back in the water for the summer.

In celebration, I put together this little slide show.

  • Use the + and – buttons to go forward or back, or jump using the thumbnail images
  • Your keyboard page forward and page back buttons will also work
  • Mouse over the image to see if I’d added any notes…

Masthead Good to Go

Another crappy weather day, so no painting today, but I did work inside on bits and pieces of Madsu’s gear.

The masthead is done and ready to go. Yesterday I discovered that the new sheaves I got to replace the old wire sheaves didn’t actually fit.

I spent a bit of quality time with my Makita sander and the aluminum plate that acts as a spacer between the port and starboard pair of sheaves.

In the photo you can see the aft pair of sheaves – and the arrow points to the spacer that runs fore and aft and keeps the starboard side sheaves apart from the port side.

I didn’t want to sand too much since the sheaves just run free – there’s no bearings – the plastic sheave just runs on the pin – so I don’t want too much play in there.

The fit is perfect now – amazing what a little sandpaper on aluminum can do

With a new spin crane, a ridiculously expensive block for the spinnaker halyard, new anchor light post, Windex, and new sheaves for the all line halyards, Madsu’s sad little masthead has been transformed.

To keep me inspired while I’m working on this stuff, I’m reading There By No Dragons: How to Cross a Big Ocean in a Small Sailboat by Reese Palley.

(if you’re wondering what the hell that thing is sticking out of the TOP of the windvane, it’s the new ‘bird spike’ meant to keep freeloaders of the avian variety off the vane).

I should say that we sailed all last summer without the benefit of a masthead Windex. Instead we used Newport shroud telltales which were great, and we’ll keep them on board again this year.

Madsu Masthead

A lot of rain kept me from getting top coat on Madsu’s spars today. So I turned my attention to the masthead, where I’m adding an anchor light and a windvane.

Since I was installing a post for the light, which means tapping 2 holes in the mast head, I figured there must be a way to use the same machine screws to attach a bracket of some sort on which I’ll mount the shaft of the windvane. I had ordered a ‘special’ bracket from Catalina Direct that uses the upper shroud tang, but like a few things I’ve ordered, it doesn’t actually fit the hardware on my mast. When a boat’s 30 years old, who knows what kind of mods have been one to the rig, so it’s not a huge surprise, but a little disappointing since I can’t return it ;-(

After cutting a short length of aluminum plate, I bent it into a bracket using a vice and a ballpeen hammer – low tech but it worked out ok. It’s too long but I’ll cut and soften up the edges now that I know it’s all going to fit together.

I’ll drop in 4 new sheaves for the main and jib halyards as soon as I shave down the spacing plate (the new sheaves from Catalina Direct are a bit too wide – easy fix if I trim the spacer a bit), I’m switching to all-line from line/wire. And of course, the new spin crane looks very inviting !

Mast Conduit and Primed

One last thing to do before I can paint Madsu’s mast, and that’s installing conduit for wiring inside the mast.

Madsu had no steaming or anchor light, and last season I got by with a portable LED that I’d hoist when needed. It worked ok but wasn’t great. When I redid the electrical system last month I installed enough circuits to incude a steaming light and masthead anchor light.

I debated whether it was worth the trouble of running conduit up the mast – but figure if I don’t I’ll be regretting it the first night an anchor as the wires clang away inside the mast.

I opted for 3/4 inch PVC conduit that will have more than enough room for the 3 wires I need to run – plus room for VHF coaxial should I decide to add a masthead antennae later. I got a laugh when I saw the label on the conduit – C22 for a C22. Nice.

Of course the conduit has to be secured, or it will bang around. This is easier said than done.

The conduit is riveted in place using a technique I read about online somewhere. Starting at the base of the mast I was able to hold the conduit in place while I drilled a hole in the mast and the conduit and popped in a rivet.

From there it’s a matter of drilling a hole 6 inches or so along, using a small Allen key to hook the conduit through the hole (in order to hold it in place), then drill another hole a further six inches along and pop a rivet in. After I was done, I filled all the extra holes and was ready to etch, condition and prime.

The mast got it’s first layer of base coat this afternoon – the boom got its 3rd and final coat of base. I should be able to get a couple more coats of base on the mast tomorrow, then on to the topcoat in a couple of days, assuming the weather holds.

Madsu’s mast

With the boom primed and ready for topcoat, I’v opted to prep the mast so I can paint both spars together.

With the experience of working on the boom under my belt, things are going much quicker on the mast. Madsu’s stick is 25 feet 2 inches long.


After filling some old screw holes I sanded the entire mast down to bare metal. Tomorrow I’ll etch, condition and prime.

As with the boom, the hardest work was in getting the hardware off the mast. I was pretty luck and got most of the fittings off with little trouble. I did have to drill out 3 of the 9 screws used to fasten a 1 inch T-track on the forward end of the mast. You can see the corrosion on the machine screws in the photo below, as well as the remains of the screws I drilled out.

Madsu’s standing rigging is now taking a break – I guess it’s ‘sitting rigging’ for now.

I’m replacing the rope to wire halyards with all rope low stretch line. I’ve got a bit of work to do on the mast head fitting – there’s a new anchor light and windvane to attach, as well as swapping out the sheaves for the new halyards.

Naked Boom Gets Primed

I sanded Madsu’s boom down to bare metal yesterday as I get ready to paint it.

After removing all the hardware I sited all the new/changed hardware and drilled and tapped the holes. I’ll use stainless machine screws instead of the self-tapping screws the previous owner loved. I’ve filled all the old holes with Star Brite aluminum epoxy.

The spar’s in great shape. I used a rotary sander to get the mast stripped down then use my Makita sander with 220 paper to prep it.

I used PPG DX 533 to etch the boom, then quickly followed up with PPG DX 503 conditioner. I got both at my local Lordco auto parts store – way cheaper than trying to find the marine version of same.

Once the DX 503 was rinsed and the boom dried, I immediately got the first coat of primer on. You can’t let the aluminum sit for any length of time after treatment because of oxidization (so I’m told).

I’ve opted for the tried-but-true-but-messy-and-smelly 2 part primer.

The Interlux 2 part is a lot more trouble – it’s really 3 part because even after you mix the 404 base with the 413 reactor, you still have to thin it 20 to 25%.

I wasn’t really sure how to work with the base – it’s the consistency of pudding – and you can’t pour it. I just stuck a mixing stick into the can and pulled it out, about an ounce or so stuck to the stick and I was able to use this ‘honey stick’ method to measure out what I needed.

I first tired a small foam roller – that was useless. Next I tried a disposable foam brush – that worked better. But a regular paint brush works best of all – the paint is thick and spreads beautifully, and there’s no worry about brush strokes showing up.

(boom after 1st coat of primer)

I left it overnight and sanded with 220 paper and got a 2nd coat on this morning. The weather’s been cold and I’d prefer it was a bit warmer to make sure the primer is really baked – I’ll give it a couple of days then do a 3rd base coat.

Now that I’m confident with is all going to work (!), I’ll strip the mast and get it primed, then I’ll topcoat both the boom and the main at the same time. I’m using Interlux Perfection, another 2 part, for the topcoat.

A quick survey of my mast hardware turned up a few issues. I was hoping to replace the spreader brackets, so last fall I ordered a stainless set from Catalina Direct.

Turns out my spreaders are 1 1/8th inch in diameter but the new brackets are 1 inch. Ugh. I’m thinking I’ll either leave the old brackets (which Catalina Direct claims are prone to unexpected breakage) or visit my new best friends at the metal store and pick up some 1 inch aluminum tubing and make my own ‘new’ spreaders.

Outhaul Exit Tweak

I’ve finally finished tweaking Madsu’s boom for the new internal outhaul system I mentioned a few days ago.

In order to make sure the outhaul doesn’t bind when pulling on the main, I figure I have to get the exit block at the end of the boom up as high as possible – which actually means mounting it in the sail track.

So the challenge here was how to mount the Harken thru-deck turning block in what is essentially the sail track. I also want the block to be rock-solid.

Working on the farm with my dad and uncles, they’d often have to tweak some piece of machinery – and in French they’d call that tweak a “patent”. Cleary, that’s what’s called for here.

All I really want to do is bolt the block in place, but there isn’t room for me to get a lock nut on the forward end of the block. I probably could rivet it in place, but I’m not convinced that’s going to work.

So, I figured I’d make an aluminum plate that will slide inside track, under the block. I’ll drill and tap for fasteners and it should all work ! The photo below shows how I want the block to sit, tight up against the slot in the boom.

I’m not really equipped to be machining parts, but I figured with my jig saw and a bench grinder, I should be able to make something that would work.

It isn’t pretty, but it’ll be out of sight anyway. Not the simplest thing to cut with a jig saw, I’ll say that much…

Here’s my “patent” when I slide it into the sail track.

The idea is that the thru-deck block is now sandwiched between my “patent” and the top of the sail track.

All I need to do now is drop in a stainless steel machine screw, tighten it up, and my exit thru-deck block is rock solid (I’ve left off the block cover so you can see the detail a bit better).

This was the last bit of detail I needed to finish on the boom before painting.

I’ve now drilled and tapped holes for all the boom hardware, including cheek-blocks for reefing lines, the outhaul exit block and cleat, and a few more bits of hardware for line management.

I’ve opted to simplify the reefing system quite a bit, just going to use a hook at the tack. For the clew, I’ll just use a single line attached to boom, up through the through the ‘new’ clew, down to a cheek-block on the other side of the boom, and forward to a cleat near the front of the boom.

Last season I was using a single line reefing system, with the line brought back to the cockpit. This was the set-up from the previous owner, and it was a nuisance.

For one, I was always going to the mast to lower the main halyard anyway, so having the reefing line in the cockpit was unhelpful. When not in use, the long line was always getting in the way no matter how often I stowed it, and when we dropped the main, it was even more in the way.

My new North Sails main has 2 reef points, so I’ve got 2 identical lines set up at the clew end. From their cheeck blocks they go forward along the boom, lead through beckets to the cleat.

The boom is stripped of all the hardware now, all the holes are drilled and tapped, so if the weather improved a bit I’ll try etching and painting the boom in the next few days

Madsu Boom Mod

I’m getting set to paint the mast and boom on Madsu before putting her in the water this year.

But before I get there, I’ve got a few modifications to make, so I’ve commandeered the picnic table and set up for some serious mucking-about-time.

I started with the boom, stripping all the hardware so I can replace the self-tapping screws with tapped versions.

I’m also fixing the outhaul – the previous owner seemed to think a piece of line wrapped around a becket at the end of the boom was a proper outhaul. It drove me crazy last season, but since the main was pretty bagged, I put up with it.

Since I’ve got a brand new North Sail main for this season, and I was stripping the boom down anyway, I thought it was worth the trouble of making an internal outhaul system based on Gene Ferguson’s excellent 1997 design. Using Gene’s diagram, I ad-libbed a bit, using Harken 225 and 226 microblocks and New England V-100 1/4″ braid and sticking with wire for the 2nd block and exit out the thru-deck at the aft end of the boom to the clew.

Since the exit at the boom-end is wire, the thru-deck block is nice and small, and through the magic of the Dremel tool I’ve managed to cut a nice slot for the block. It sits in the foot channel and is just big enough to reach into the main section of the boom where the guts of the outhaul are hidden. Having a swaging tool makes working with wire a breeze – I picked up a hand tool at West Marine last year and have used it a lot more than I thought I would.

I’ll have more pictures soon – the outhaul is rigged and sitting in my cupboard with the new sail.

Madsu’s New Andersen Winches

Madsu’s still on the trailer in the driveway. It puts a crimp on sailing, but is handy for doing upgrades.

I’ve just finished replacing the electrical I didn’t get to last year, pics on that soon.

Today I finally got the new self-tailing winches installed. As I mentioned a few weeks ago, I pulled the old Lewmar winches off the cowling along with the cleat –

20080321_coaming.jpg

I managed to get the fiberglass fairly clean, filled the old holes, and drilled six new holes for the new Andersen winches –

I picked up some 1/4 inch aluminum plate from Express Metal supply in Burnaby and cut & drilled some backing plates –


With some help from Garnet and Matthew, bolted the new winches down, and they look downright lovely – even if they are on a boat in the front yard !

New Winches for Madsu

As I blogged about last year, I picked up 2 new Andersen winches for Madsu, and they’ve been in their nice boxes since I bought them at Steveston Marine.

I spent most of this afternoon removing the old Lewmar winches and jam cleats from Madsu’s cockpit coaming. The Lewmars were attached with 4 bolts, and I was by myself so it was a bit of challenge.

20080321_coaming.jpg

Getting the bolts out meant having to crawl into the cockpit lockers to clamp a pair of locking pliers to the nut, jam it up against the hull, then back up into the cockpit to unscrew the bolt until the nut dropped off.

Its not exactly roomy in there so each trip was a bit of a contortionist act. By the time I got the starboard winch off I came up with a better plan for port side; 4 pairs of locking pliers, one for each bolt, reducing the number of tight squeeze tricks to one.

I’ll fill the old holes, clean up the coaming, and site the new winches over the next couple of days.

The old Lewmars still have some life in them, so I’m going to service them and see if anyone wants to buy them. I don’t know how old they are, but they’ve been around a while. For their size their really well made and that English steel must be a fairly high grade as they still look pretty good. You can see from the picture of the coaming that the old winch and cleat have been on for a good long time.

The Andersen winches really are gorgeous. Sitting on the kitchen counter next to the Lewmar you can see the added heft of the Andersen winch, the larger drum will make a big difference when hauling in the 150 – I can’t wait to get them on the boat. Having the self-tailers is going to make a huge difference for me since I’m solo sailing a lot of the time. And the cockpit will be a little neater too, I never did like the placement of the cleat.

20080321_winches.jpg